AdoModel LoRaWAN NS Platform User Guide
A universal LoRaWAN management platform — applications, devices, gateways, data observation, downlink testing, and RESTful API & MQTT integration.
1. Introduction
1.1 Overview
LoRaWAN Manage is a universal LoRaWAN management platform developed based on the loraserver project, supporting multiple frequency bands and configurations. By managing applications, devices, and gateways, LoRaWAN network construction and maintenance functions can be achieved. The platform supports standard RESTful APIs and MQTT communication interfaces to achieve user-defined data acquisition and application development.
This document mainly includes an explanation of the platform's basic business structure and an explanation of interface usage.
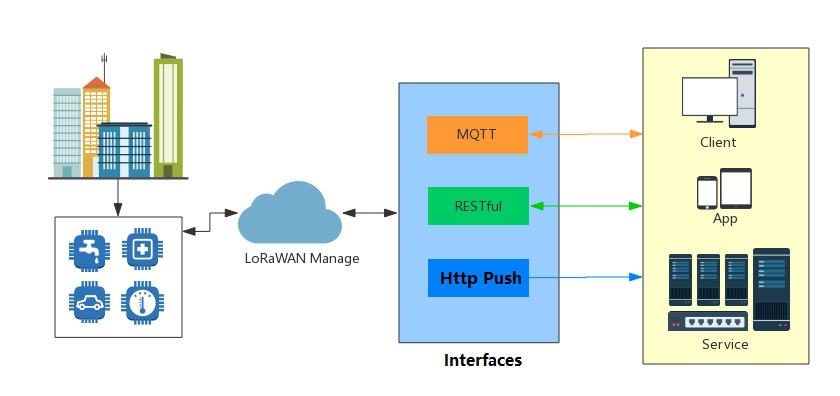
Platform Data Models
The platform is built around the following top-level data models:
1. Users
Users are the model used in the platform to distinguish different identities, and are the top-level data model of the platform. Different users will have different network service profiles, device profiles, applications, devices, and gateways. Each user will obtain a token (using JWT standard) through the login authentication function. Through the token access interface, the platform will return the resource to which the user belongs.
In addition, users of the administrator type will have all platform permissions, be able to operate other user attributes, switch identities, or directly access designated user resources, and control the system settings. Administrator type users can only be used during private deployment, while public cloud administrator type users are controlled by AdoModel.
2. Network-servers
Network servers also belong to the top-level data model of the platform. In the platform architecture, by defining different network servers (server services in loraserver), users can be provided with LoRaWAN network servers with different configurations (such as LoRaWAN frequency band: US915 \ eu433…).
For normal users, when creating a service profile, they can (and should) retrieve the network server list supported by the platform for selection, while when creating a device profile and gateway, they can (and must) retrieve the network server list that belongs to the user. Only administrator users have the permission to view and edit the platform's network server list.
3. Service-profiles
In the platform architecture, different configurations of network services are provided to users through an application service (i.e. the platform itself). The core is to create a service profile, and the system will record the routing direction of the network service data and push it to the application. Therefore, when users want to use other data models, they must first create a service profile to mark whether the network server can be used by the user.
Each normal user can create any number of service profiles, which include corresponding network servers (added and managed by administrator users) and device status request related configurations. When creating an application, the service profile belonging to that user can (and must) be called for selection. As service profile is controlled by the routing of data, the selected network server when creating device profile and gateway must be accessible to the user.
4. Device-profiles
In order to reduce the coupling of LoRaWAN parameters when creating devices, the platform provides a configuration abstraction. When creating a device, the device will use the device profile, which mainly includes the network server used, the network access mode, and the attributes of LoRaWAN device types (class A, class C). Each normal user can create any number of device profiles, and the selected network server during creation must be one that the user can use.
5. Applications
An application serves as a container for loading devices, and the device must belong to an application. Under the application, attributes such as data subscription and push and MQTT authorize can also be set for all device data within the application, which are the basic attributes for the platform to distinguish data.
Each normal user can create a limited number of applications, depending on the overall system allowance and the number allowed by the administrator for the user to add. When creating, a Service profile must be selected, which will use its corresponding network server and some network parameters. After determining the Service profile, when calling the device profiles list belonging to the application under this application, the device profile using the same network server will be automatically presented.
6. Devices
The device is used to record the identity of the actual LoRaWAN nodes in the network, and it belongs to a certain application. When adding a device, it is necessary to retrieve the device profile list that belongs to the application to which the device belongs. However, when the application uses a certain service profile, the device profile list can be filtered by the application to obtain effective device profile. For example, for an application that uses a US915 network server, adding a device that uses EU868 device profile is invalid.
After creating the device, several sub attributes can be operated on, such as device keys, obtaining live data or live LoRaWAN frames, etc.
7. Gateways
Gateway is an independent model that belongs to the platform and is only used for monitoring. Even if a gateway is not added to the platform, as long as the actual LoRaWAN gateway is connected to the platform according to configuration, it can still work normally. When creating a gateway, the selected network server must be accessible to the user.
2. Quick Start
2.1 Main User Interface
After logging into the platform, the platform will default to the application list window. The main interface layout of the platform is as follows:
- Menu bar: switchable main content window
- Main content window: display corresponding information
- Help: switch to help document
- Language: the system supports switching between Chinese and English languages
- User menu: can be used to view personal information, update password, log out
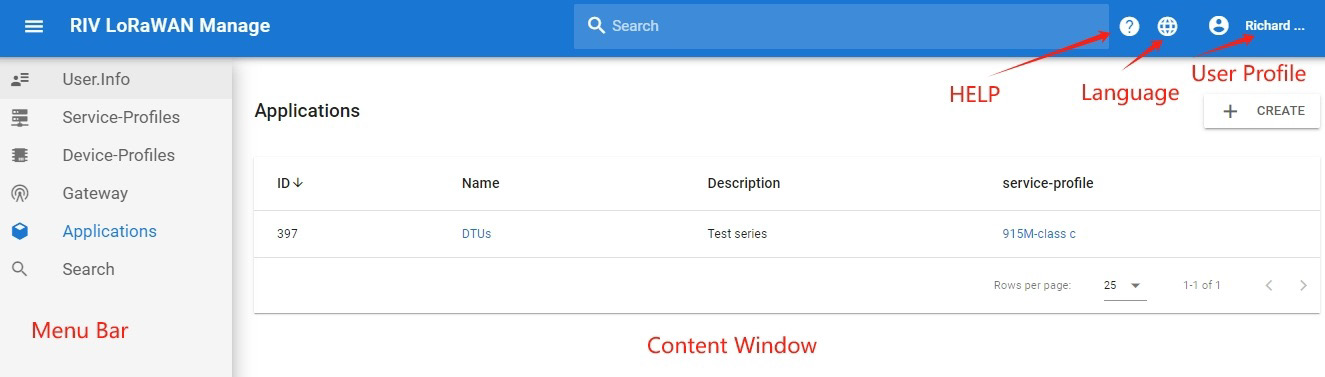
2.2 Create a Service Profile
Network service profile is a prerequisite for creating applications, gateways, devices, etc. A user must create a network service profile in order to further perform other operations.
- Enter the service profile menu.
- Click the Create button.
- Enter according to the form prompts and select a required network server (managed by the platform administrator). After completion, click Create.
Complete the creation of a network service configuration here.
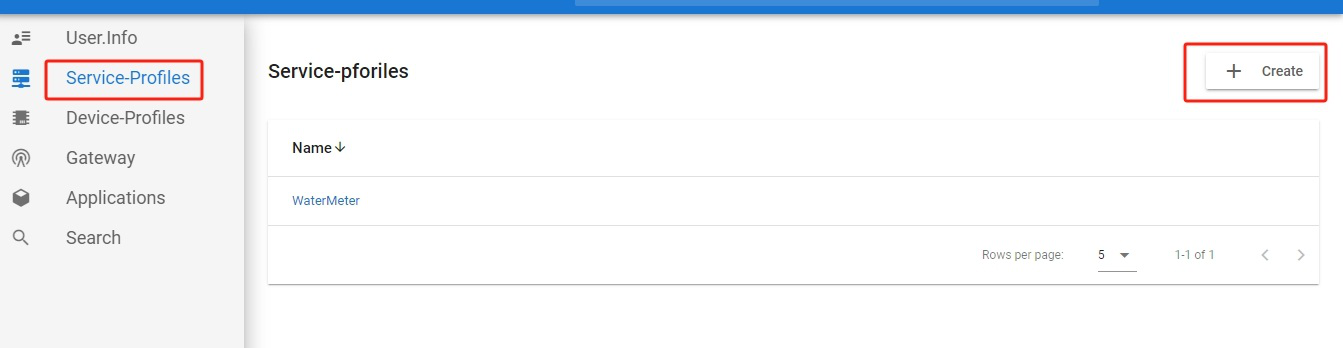
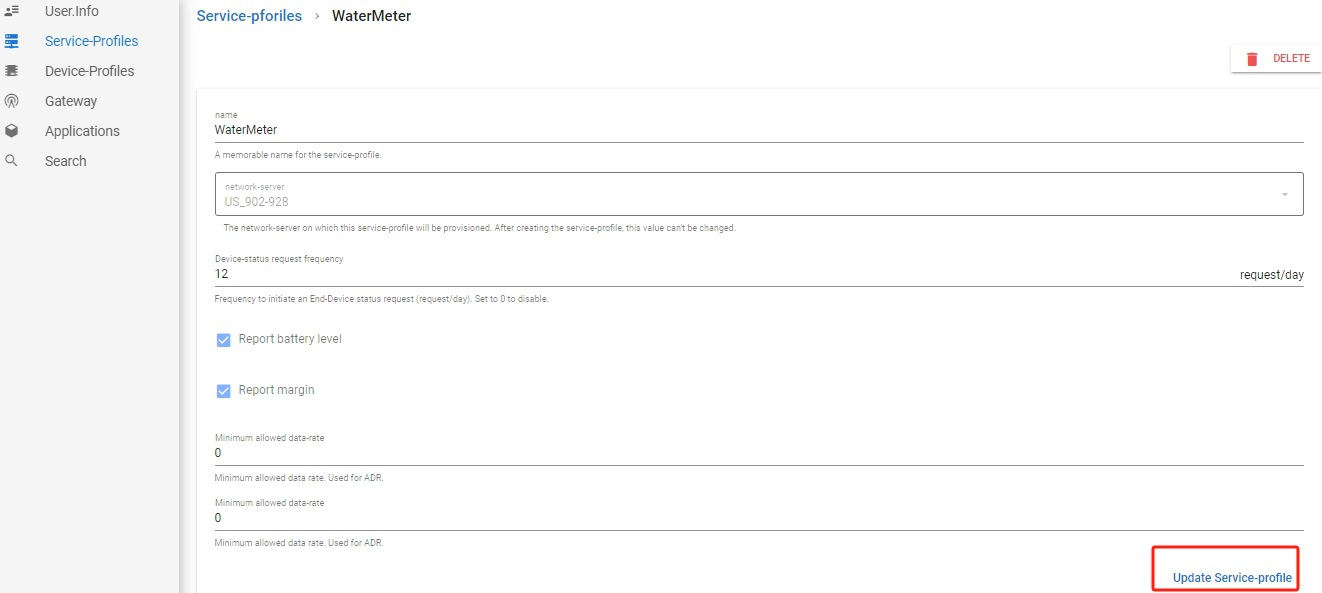
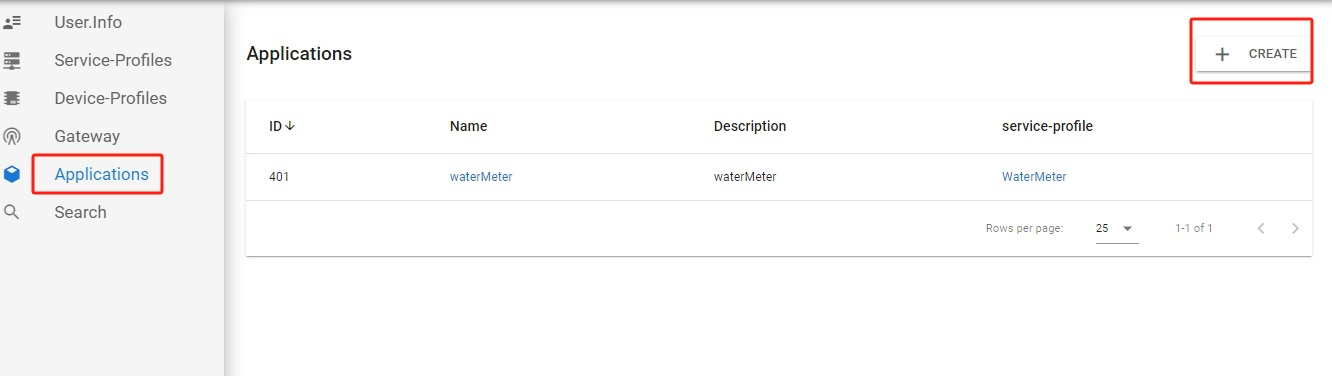
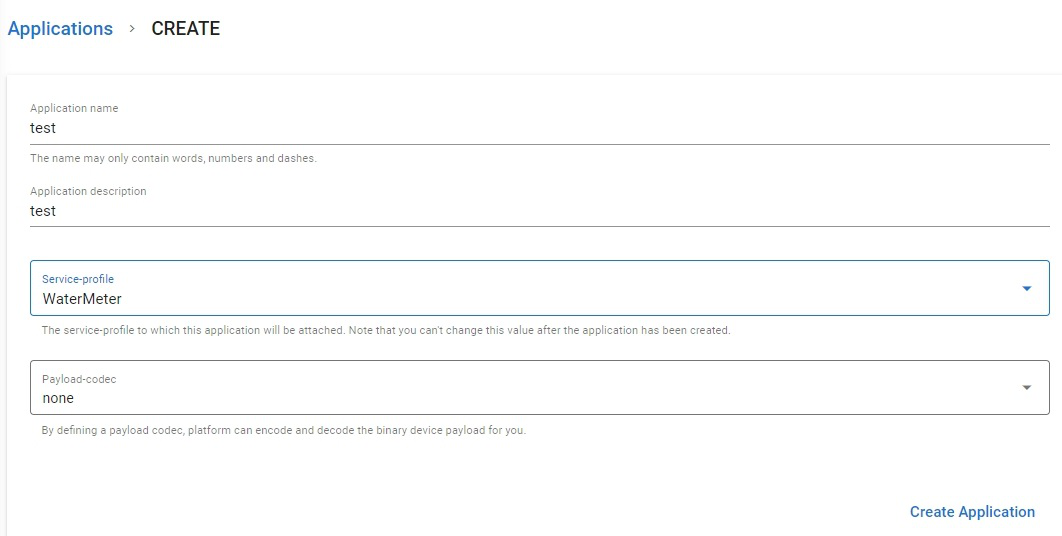
2.3 Create an Application
On the platform, all node devices must be under a certain application. After the Service Profile is created, the application can be created.
- Enter the applications menu.
- Click the Create button.
- Fill in the form input information and select a service profile. If the user has not created a service profile, they cannot obtain a list of service profiles.
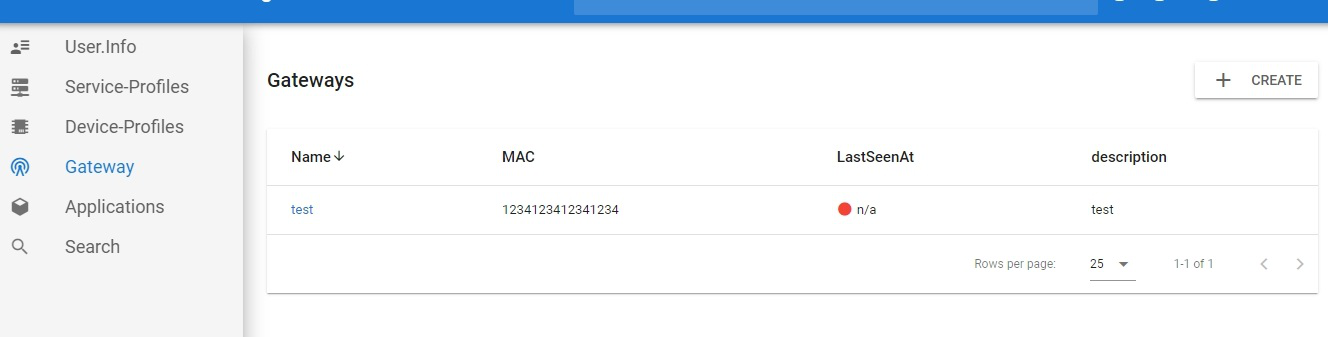
2.4 Create a Gateway
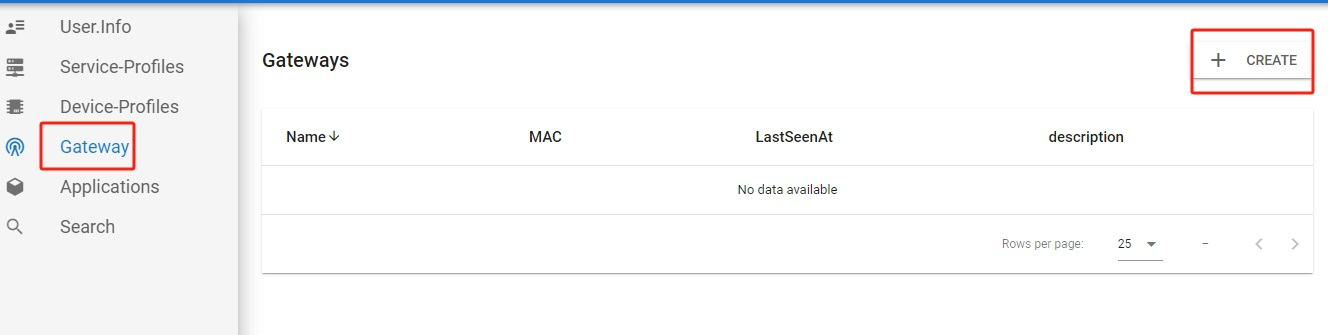
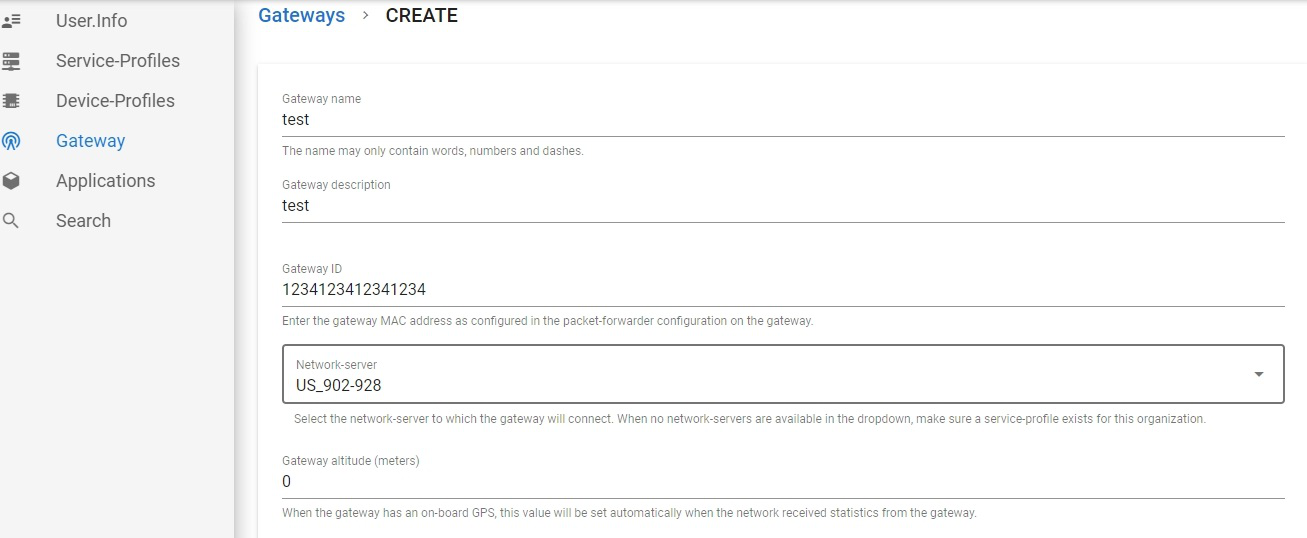
On the platform, the purpose of creating a gateway is to view the status of the gateway and view the live LoRaWAN data frames received by the gateway. However, even without creating a gateway on the platform, the gateway can still function properly when it is correctly configured. Please refer to the relevant gateway documentation for gateway access operations.
- Enter the Gateway menu.
- Click the Create button.
- Based on the form data, select a network server (if the user has not created any service profile, the list of network servers cannot be obtained).
- After completing the gateway creation, the gateway status can be viewed in the gateway list or details, including whether it is already online, etc.
2.5 Create a Device Profile
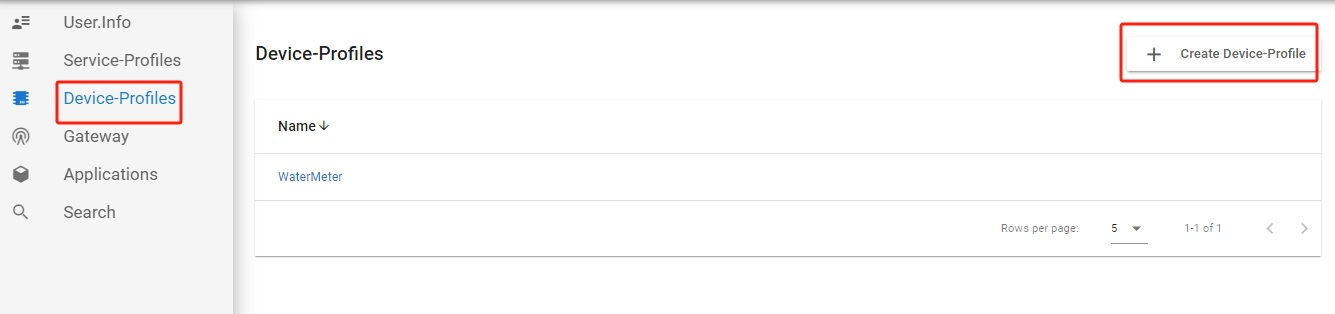
Device profile is an abstract property of a device. As long as a device profile is created and a device profile is selected during device creation, the properties of that device belong to the description in the device profile.
- Enter the device profile menu.
- Click Create Device-profile.
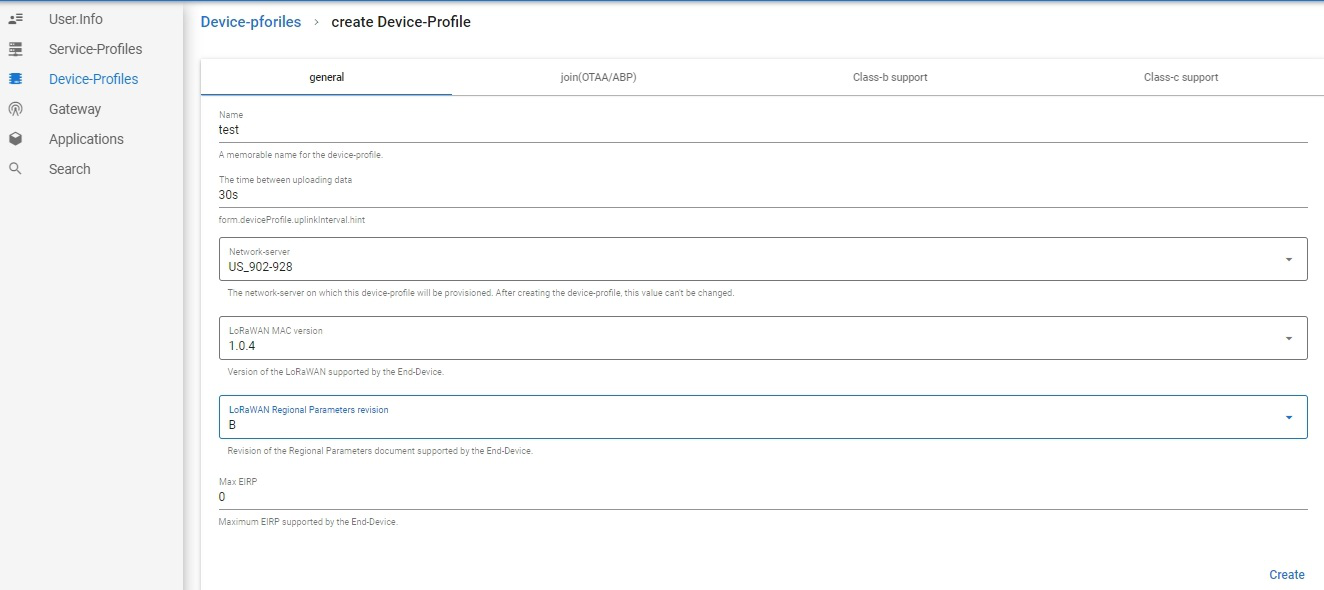
- Based on the form data, select a device profile and click Create to complete the form.
The device profile includes the device's type, network mode, network server used, LoRaWAN MAC version, and parameter revision version.
2.6 Create a Device and Activation
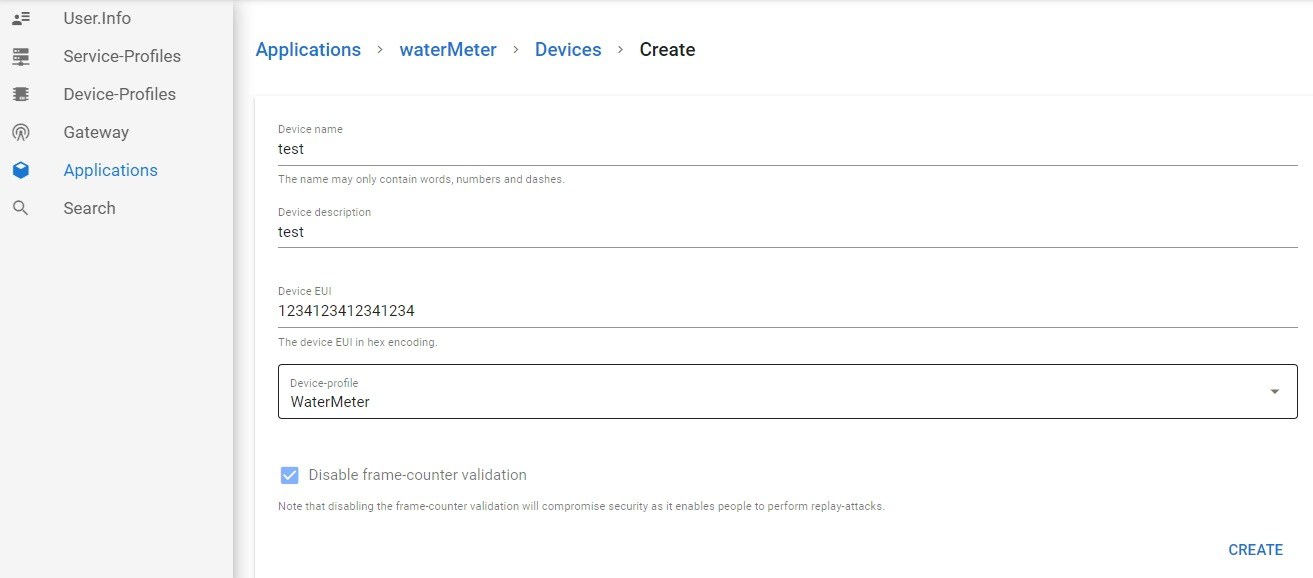
After preparing the application and device Profile, the creation of the device, also known as the terminal node, can proceed.
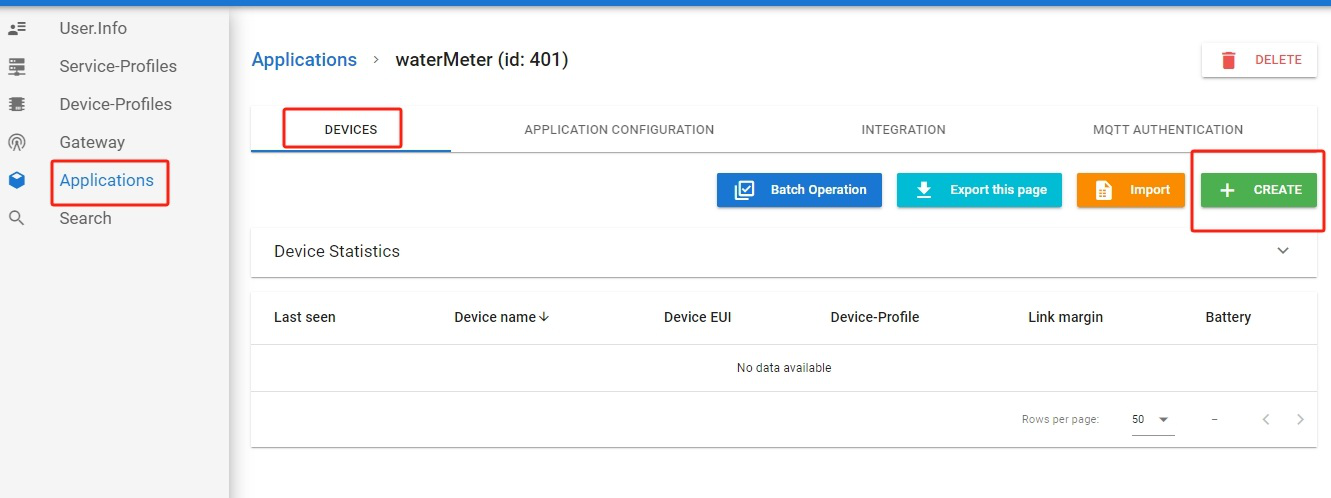
- Enter the application list menu and select an application from the application list.
- In the application, the default first displayed node list is the current application. Click the add node button to enter the add form.
- Based on the form input, select the required device Profile and complete the creation.
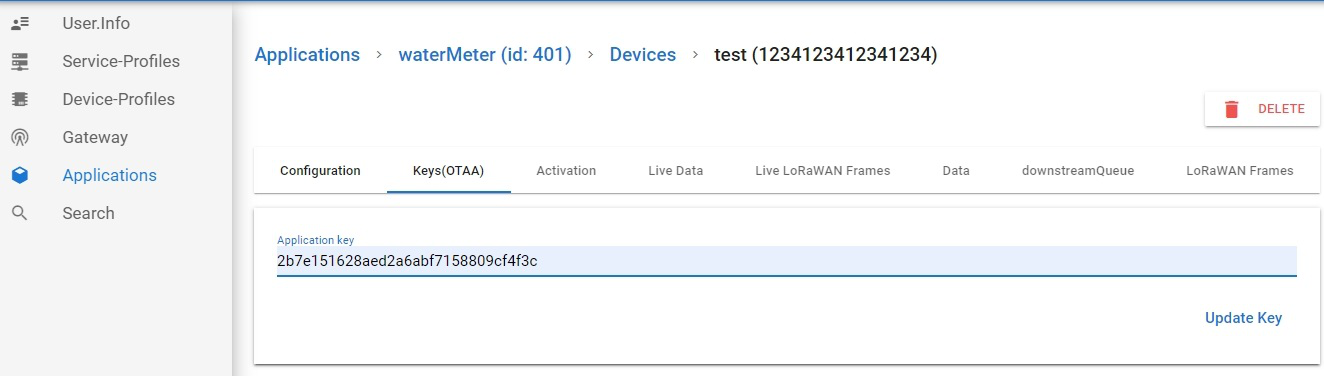
- After creation, it will default to the internal details of the device. Depending on the type of device, activation can be performed. If it is OTAA, fill in the application key in the Device Key (OTAA) tab and click the Update Key button. If it is ABP, enter the Activation Status tab for manual activation.
After activation, the registration of a device on the platform is completed.
2.7 Observe Device Data
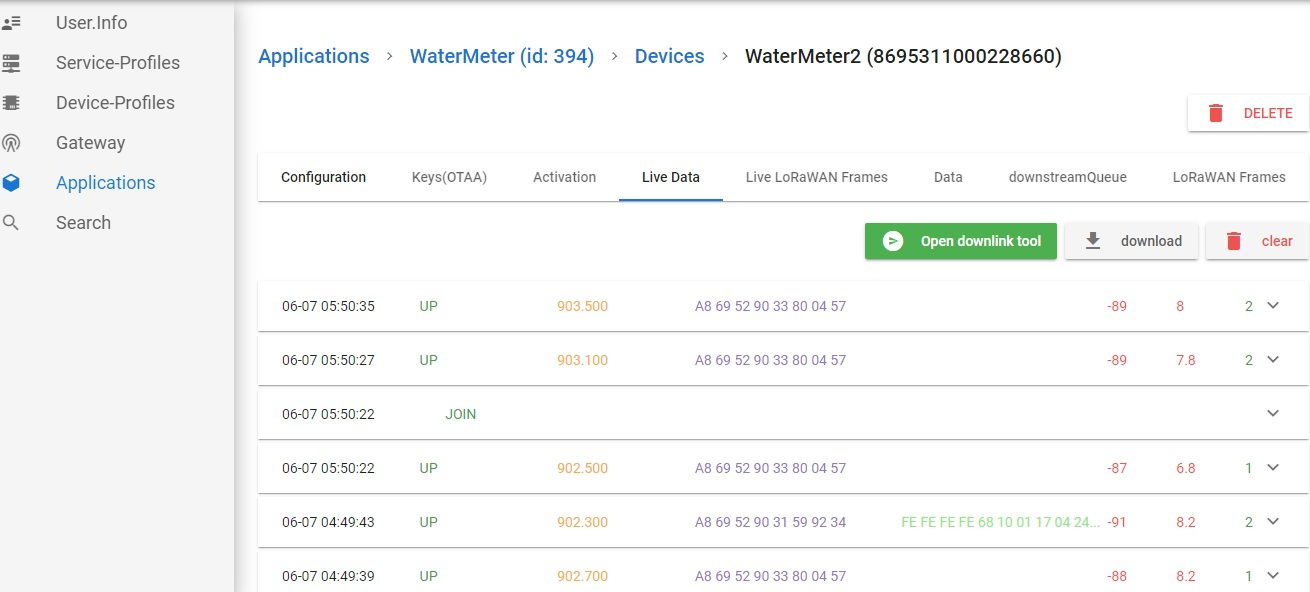
After completing device registration, start the device and ensure that the gateway is online, so that it can be viewed in the live data window.
Observe real-time application data of devices
The device application data is the actual decoded data, and the detailed structure can be found in the open API. You can enter the Live Data tab to view it.
Observing Live LoRaWAN frames of devices
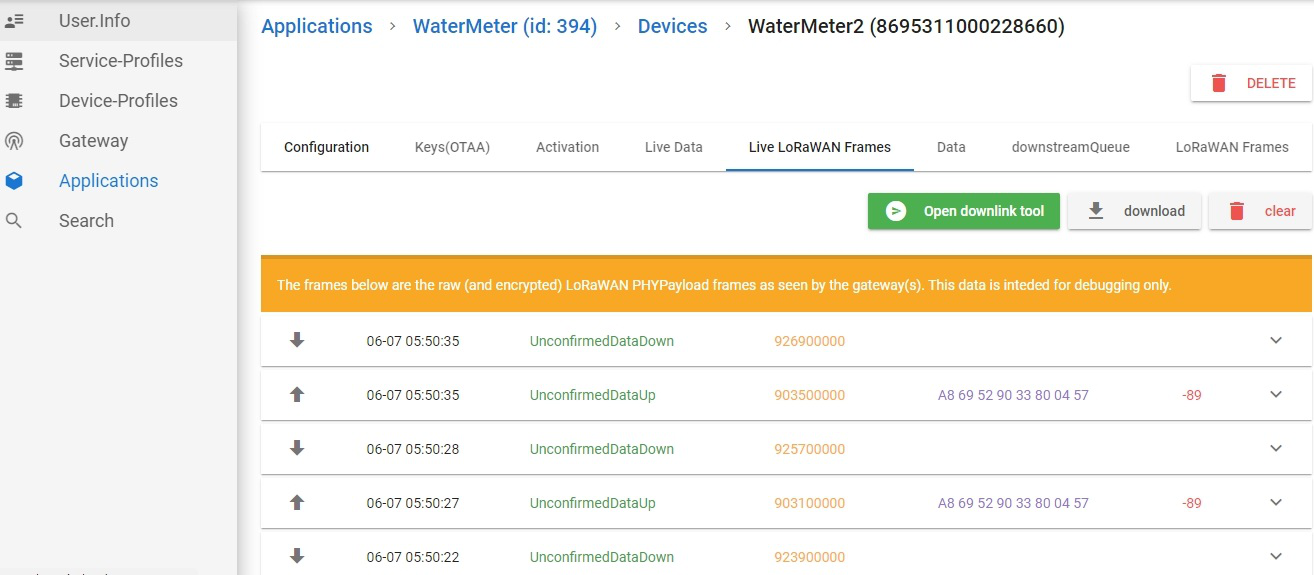
The LoRaWAN frame contains uplink and downlink packets, which are the original frame data. The application data is not decrypted, so it can only be used for network debugging. You can view it by entering the Live LoRaWAN data frames tab.
3. Basic Functions
3.1 Service Profile
The network service configuration function is used to distinguish the network servers that users can use. One network service configuration corresponds to one type of network server on the platform, such as US_915.
The network service configuration includes the following attributes:
| Attribute | Description |
|---|---|
name |
The name used for display and identification. Only English letters and underscores are allowed. |
| Network Server | Once the selected network server is created, the application configured using this network service will only receive data from the corresponding network server, and the user may choose the corresponding network server when adding a gateway or device configuration. |
| Device status request frequency | The platform will use the MAC command devStatusReq specified in the LoRaWAN protocol to request the status of the device. The device will return the device's battery level and signal-to-noise ratio based on the request and store them in the platform's device properties. When set to 0, it means the platform does not send requests. |
| Minimum and maximum allowed rates | This parameter is used to set the maximum and minimum speed limit that the server can use when sending ADRs to nodes. 0 is not set, and the platform defaults to using it. |
3.2 Device Profile
On the platform, a configuration abstraction can be created to represent a type of device, which is called device configuration. After creating a device configuration, the actual device inherits its parameters. The main function of device configuration is to specify the network server, network access mode, and type (Class A / Class C) used by the device.
The main attributes of device configuration include:
| Attribute | Description |
|---|---|
| Name | Name of the device. |
| Network Server | The network server used. |
| LoRaWAN MAC Version | The MAC version in the LoRaWAN specification, e.g., 1.0.2 used by our company's end devices. |
| LoRaWAN Regional Parameters Version | The regional parameters revision in the LoRaWAN specification, e.g., Rev B used by our company's end devices. |
| Other attributes | Should be filled in according to the prompts and actual needs. |
Parameter description for ABP mode
When ABP mode is selected, the platform allows manual configuration of certain parameters, primarily RF RX window parameters. When the device is activated via ABP, it will initialize using these parameters. In practice, after the device communicates with the server, the server compares these configurations with the network server parameters. If there is a discrepancy, the server will issue a MAC command to notify the device to update them. Upon responding, the device will switch to using the network server parameters.
On the platform, the network server parameters strictly adhere to the default values specified in the LoRaWAN standard. Especially on the public cloud platform, AdoModel will not make special modifications. For private cloud deployments, users can configure and deploy using their own custom parameters as needed. The platform does not provide a feature to directly modify network server parameters; these can only be added or updated via deployment configurations.
In OTAA mode, these parameters are automatically configured during the join procedure. When the server sends the Join Accept message, it conveys the network server parameters to the device.
Network access mode & class support
- Network access mode: OTAA, ABP
- Class support: Class A, Class C
3.3 Application
Applications are the carriers of platform devices, and all devices belong to a certain application. In the application, there are mainly the following contents:
1. Device List
In the device list, you can view the current node list in the application and add new nodes.
2. Application Settings
Modify the basic information of the application, such as description, name, and key; modify the load data decoder (see Custom Codec).
3. Data push
In the platform, each application can set up an HTTP push interface. Once a device uploads data within the application, the platform will make a POST request based on the endpoint set in the application, and transfer the device data to a third-party server.
4. MQTT authentication
The platform supports API access to the MQTT protocol (details can be found in the open API), and the interface permission configuration of MQTT is achieved by creating MQTT passwords within the application. An application can create multiple MQTT passwords for different needs to connect.
3.4 Custom Codec
Codec is a basic feature provided by the platform. By default, the data uploaded by the device is the original base64 encoded string, which needs to be parsed by the user at the application level. In addition, if a custom codec is set on the platform application, the device will add fields to the data after reporting the data:
{
    ...
    "object": {                    // Decoded JSON object (filled in when the application has set the codec)
        "temperatureSensor": {"1": 25},
        "humiditySensor": {"1": 32}
    }
    ...
}
Specific data interfaces can refer to open APIs.
The encoder provided by the platform consists of two custom JavaScript functions that need to be modified in the application settings. You can achieve parsing and encoding of different object objects through custom code writing.
- Decode function
Decode(fPort, bytes):bytesis the byte code array of device data. For example,[255 255 255]represents the byte code dataFF FF FF. In the function body, by processing thefPortandbytesparameters, a JavaScript object is finally returned to complete the decoding setting. For more details, please refer to the JavaScript language. - Encode function
Encode(fPort, obj): on the contrary, when a user descends data through an API interface at the application level, if they carry anobjectobject, the object will be encoded through this encoding function and ultimately return a bytecode array.
const, let, for-in, for-of, etc.
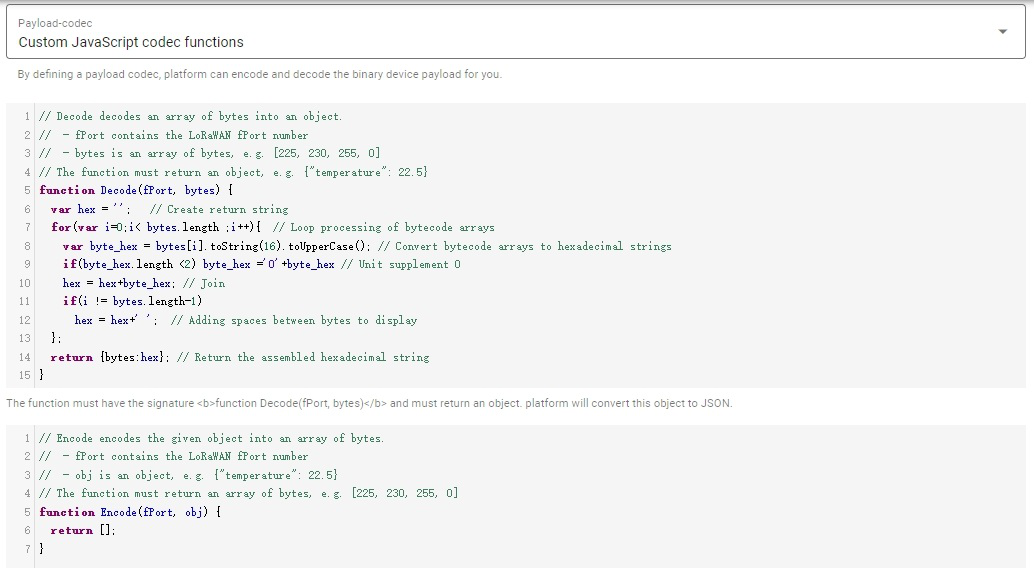
Simple Example
As shown in the screenshot of the decoding function:
Decode() functionfunction Decode(fPort, bytes) {
var hex = '';
// Create return string
for(var i=0;i< bytes.length ;i++){
// Loop processing of bytecode arrays
var byte_hex = bytes[i].toString(16).toUpperCase();
// Convert bytecode arrays to hexadecimal strings
if(byte_hex.length <2) byte_hex ='0'+byte_hex
// Unit supplement 0
hex = hex+byte_hex; // Join
if(i != bytes.length-1)
hex = hex+' ';
// Adding spaces between bytes to display
};
return {bytes:hex};
// Return the assembled hexadecimal string
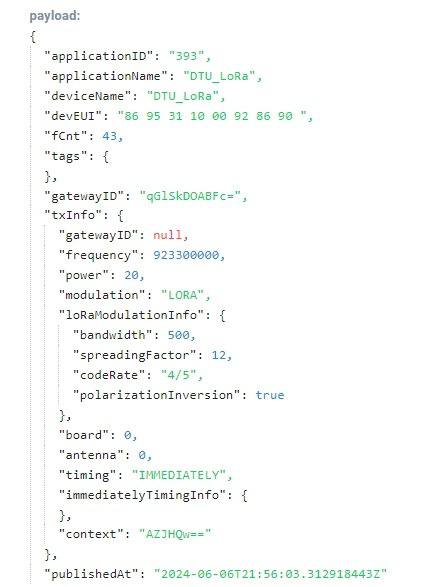
}The function returns the hexadecimal string of the data uploaded by the device, as shown in the following figure.
3.5 MQTT Authorize
The MQTT interface of the platform is authenticated through the application, and users must create an MQTT connection password in the application in order to use the MQTT interface:
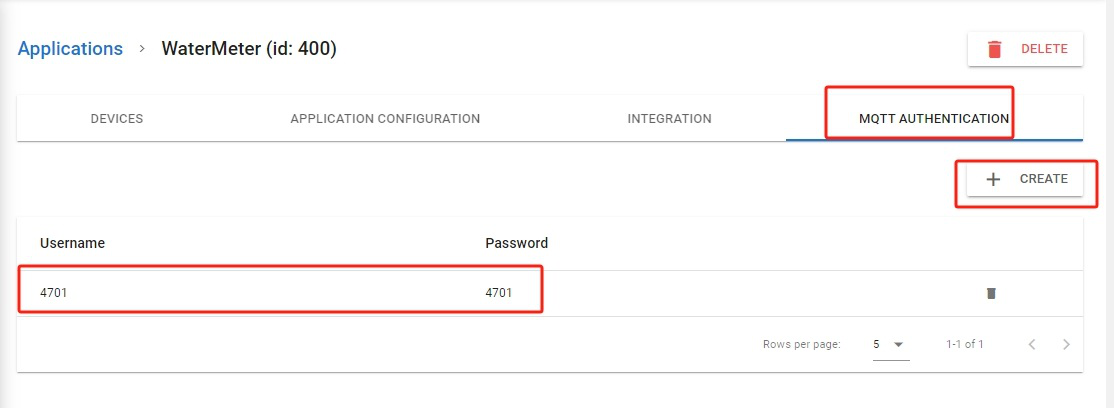
After creation, using the MQTT client to create a connection requires adding corresponding authentication information, such as:
mqtt://4701:4701@adomodelcloud.com:1883Please determine the account password transmission method for each MQTT SDK by yourself.
3.6 Device
A device is a model used to bind actual node devices, which is used to record the identity of the device in the LoRaWAN network and store network access sessions. The main attributes of the device are:
- Name: the name of the identification.
- Description: device description.
- DevEUI: unique identifier of a node in the LoRaWAN network.
- Device configuration: refers to the specific network parameter configuration of the device.
- Ignoring frame count verification: does the platform ignore frame count verification for this device.
- The device may receive messages from multiple gateways with the same
fCnt, which may have a certain impact on the reception of application data (due to the LoRaWAN gateway broadcast mechanism). - The device may be vulnerable to replay attacks.
The main functions in the device:
- Device Key: when the device is OTAA, the
appKeycan be configured. - Activation status: check the activation status of the current device. If it is an ABP device, you can directly modify the activation status and manually (re)activate it.
- Live data: real-time event data of the current device can be viewed on the UI, and detailed information can be viewed on the open API.
- Live LoRaWAN data frame: the real-time LoRaWAN data frame of the current device can be viewed on the UI. Please note that the data within this data frame has not been decrypted, and this function is only for development and debugging purposes.
- Historical Data: you can view the historical data of several events such as upload, ack, error, and join on the device in the Historical Data tab, and provide API access.
- Downlink testing: can perform data downlink on devices in the Downlink Tool in the Live Data and Live LoRaWAN Frames windows.
3.7 Import and Export Devices
In order to facilitate users to import multiple devices, the platform encapsulates batch operation functions on the UI, which includes device export and import functions under a single application. Users can use the factory exported device list to store in a file of .xls or .xlsx, or import through a device list made in their own format.
1. Import/Export file format
As file format in the figure:
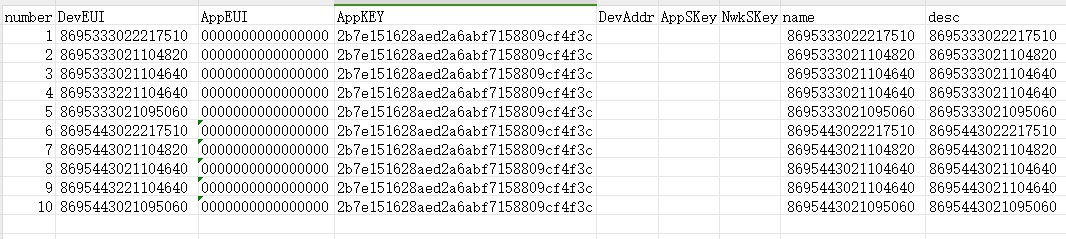
| Field | Description | Required |
|---|---|---|
number | Serial number; the same serial number cannot exist. | True |
DevEUI | Device EUI. | True |
AppEUI | AppEUI is a field that has no effect temporarily — reserved. | False |
AppKEY | The appKey used by OTAA. If the device is about to access the network in OTAA mode, fill it in, otherwise the activation will fail. | False |
DevAddr | DevAddr in ABP mode. If the device is about to connect to the network in ABP mode, fill it in, otherwise the activation will fail. | False |
AppSKey | AppSKey in ABP mode. If the device is about to connect to the network in ABP mode, fill it in, otherwise the activation will fail. | False |
NwkSKey | NwkSKey in ABP mode. If the device is about to connect to the network in ABP mode, fill it in, otherwise the activation will fail. | False |
name | Device name in the platform; will be named as devEUI if not filled. | False |
desc | Description of the device. | False |
2. Import
First, enter the application and, on the device list page, you can see the import and export menus.
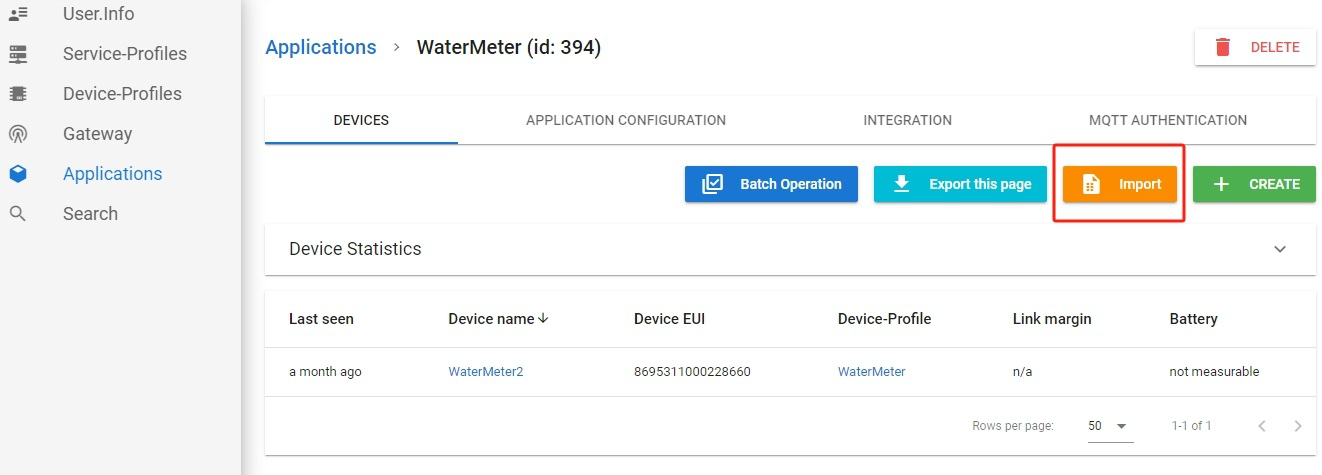
xls or xlsx file — the UI directly reads the file and an import window pops up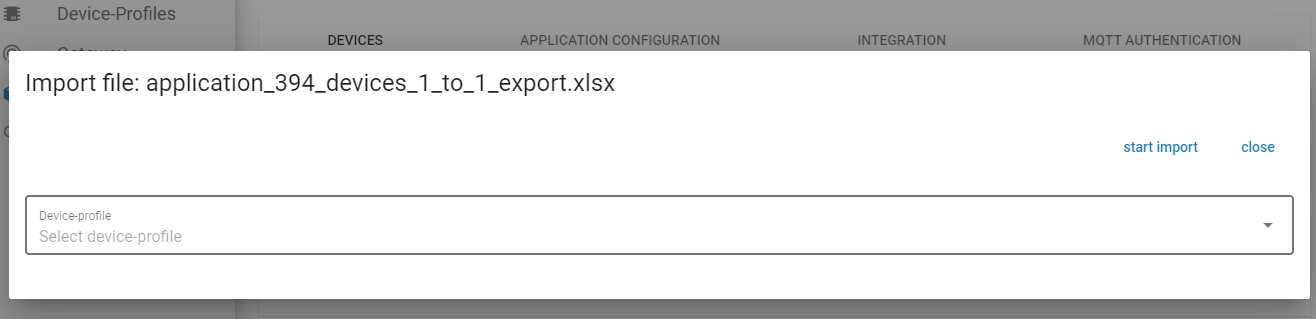
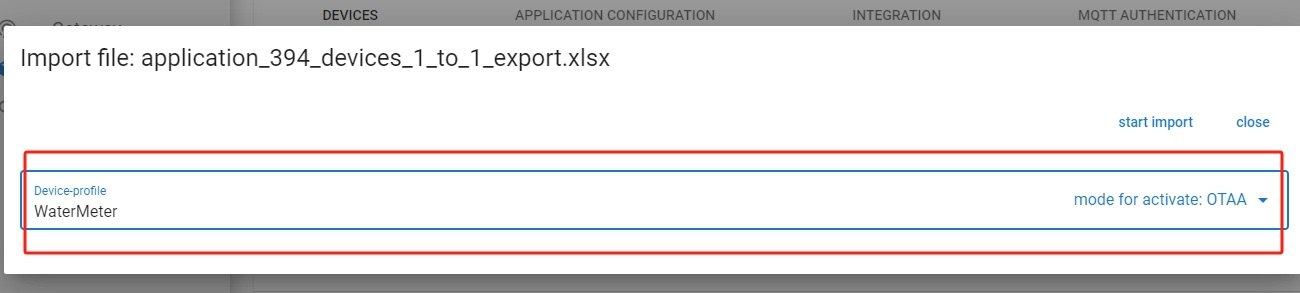
3. Export
Provide export of current page devices in the device list view under the application. You can export more devices at once by selecting to display more devices on a single page.
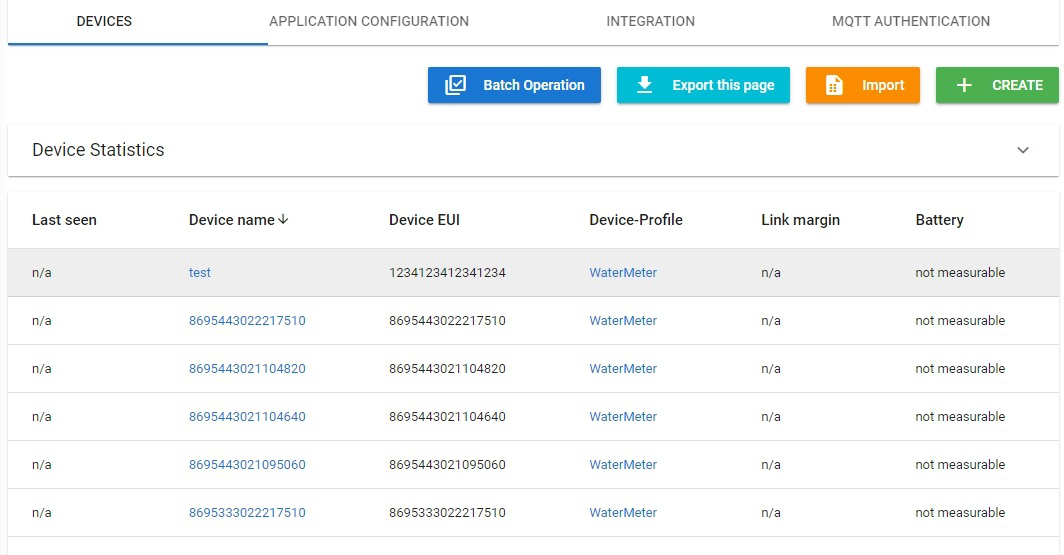
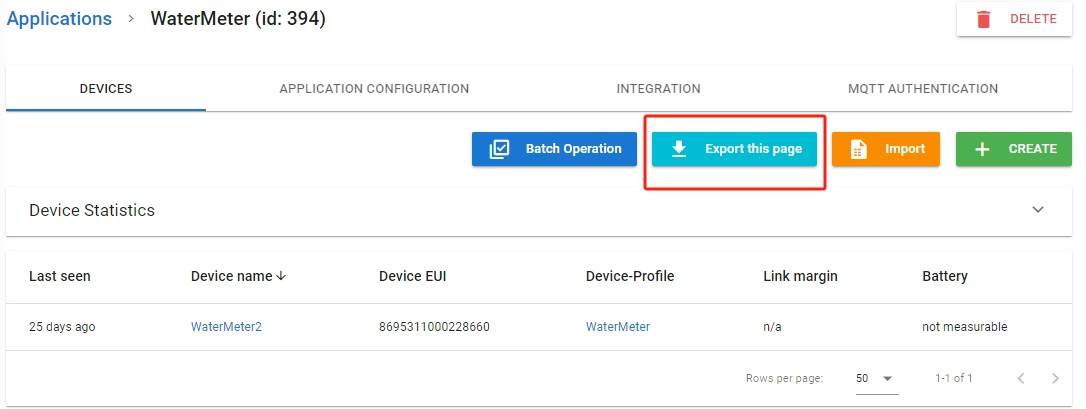
appKey will be empty.
3.8 Global Search
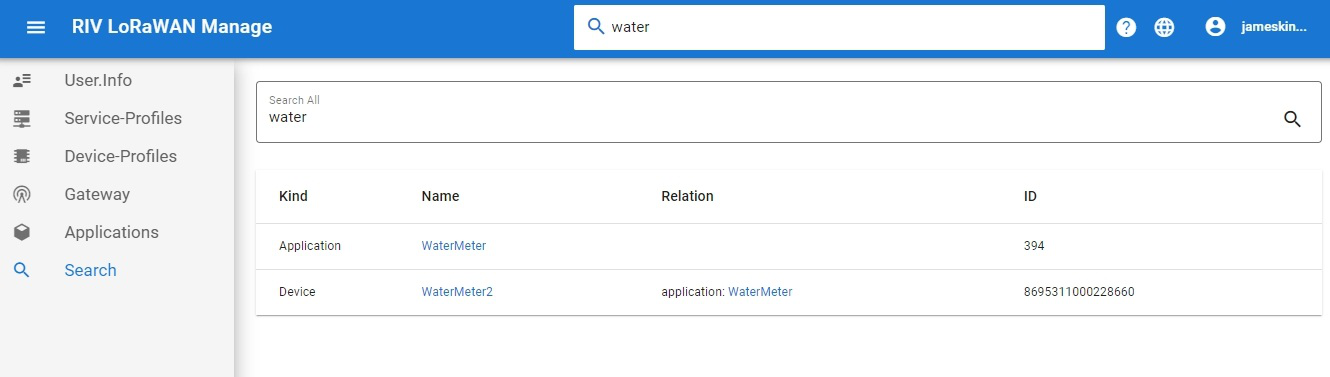
On the platform, users can directly search for applications, devices, gateways, and users (only administrators) through keywords, and the results will be presented in a table with their relevant connections displayed.
3.9 Gateway
The addition of a gateway on the platform is only for management and monitoring purposes, and cannot actually control the gateway. The gateway is identified by the gateway ID (MAC address, defined by the packet forwarder software within the gateway) and the network server used by the gateway.
Function of gateway
- Check gateway status
- Modify gateway parameters
- Gateway LoRaWAN data frame: all data frames received and sent by the gateway will be displayed. Please note that since the node identification in the LoRaWAN data frame is not
devEUIbut the device address code, the message will not containdevEUI.
Gateway access platform
At present, the platform provides support for 5 frequency bands by default. The gateway needs to modify the configuration file in the packet forwarder and restart it to complete gateway access:
// global_conf.json / local_conf.json
{
 ...
 "gateway_conf": {
   "gateway_ID": "0102030405060708",
   "server_address": "adomodelcloud.com",
   "serv_port_up": 915,
   "serv_port_down": 915,
   ...
 }
 ...
}
The default ports for the frequency bands supported by the platform are:
| Frequency | Port |
|---|---|
| CN_470-510 | 470 |
| EU_433 | 433 |
| EU_863-870 | 868 |
| US_902-928 | 915 |
| AS_923 | 923 |
| AU_915 | 1915 |
| IN_865 | 865 |
Private deployment can be changed on its own.
3.10 Users
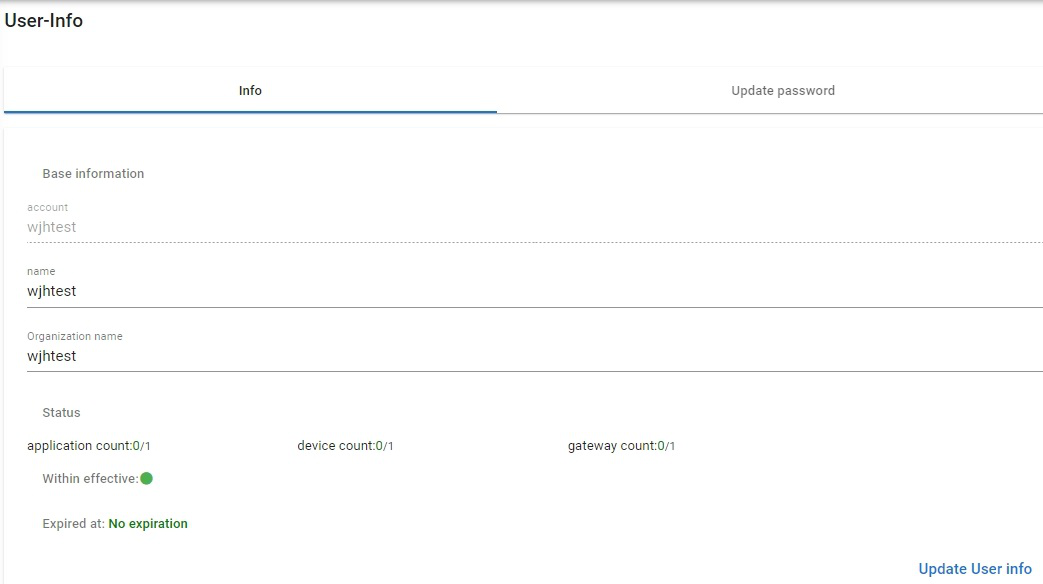
As a model for identifying different organizations on the platform, users can modify their user name and organization name within the platform, as well as view the system usage limit and validity period of the current user. They can also modify their login password on their own. At the same time, in open APIs, API authentication is also obtained through the user's account and password.
The system usage and validity of users are configured by the platform administrator. If the usage is insufficient or exceeds the validity period, you can contact the system administrator.
4. Downlink Data Test
4.1 Data Downlink Description
The platform performs LoRaWAN data downlink through RESTful or MQTT interfaces, and provides a corresponding device downlink testing tool on the UI. However, for LoRaWAN downlink, there is a fixed logical specification. When calling the downlink interface on the platform, the actual data is not actually issued. The platform caches the command, calculates the downlink timing according to the rules of LoRaWAN device types, and only sends the data packet to the gateway at the appropriate time.
Class A situation
The basic rule of class A is that the receiving window will only open after uplink. Send data to the platform, cache the data in the queue, and wait for the device to upload. After the device uploads data once, the platform will actually send this command from the queue to the gateway.
When multiple data are continuously sent to the platform, the platform caches the data to a queue and waits for the device to upload. After the device uploads data once, the platform sends the earliest command from the queue to the gateway, identifies it as pending, and requests the device to continue uploading to receive subsequent data.
Class C situation
Class C is ready for downlink at any time, so the platform will directly distribute the data. Additionally, if the distribution type is confirmation required, the platform will temporarily cache this message until it receives confirmation from the node, or clear it according to the response timeout setting, and finally trigger the ACK event data.
4.2 Data Downlink Tool
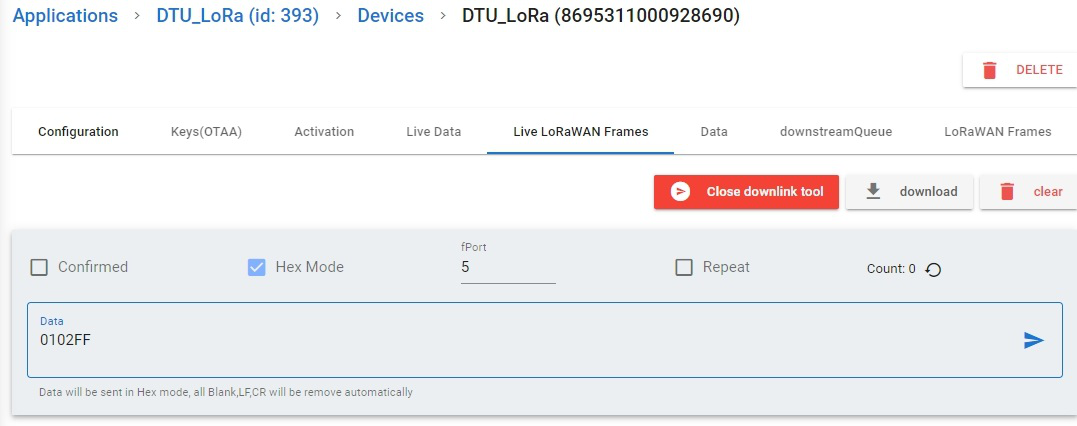
In the Live Data and Live LoRaWAN Frames tabs of the Device, you can open the downlink tool. Fill parameters and data according to requirements, then the server will schedule a downlink packet to the device:
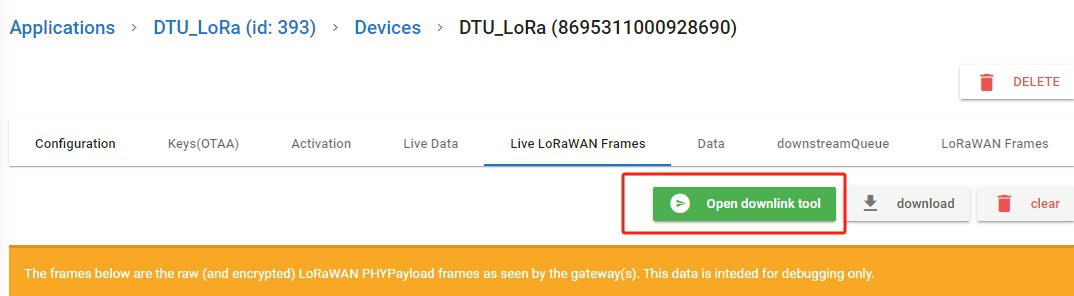
Parameters:
- Confirmed: refers to whether the scheduled downlink packet is a confirmed type packet in LoRaWAN.
- Hex mode: the server-side API allows the use of
stringorhexmode for downlink data. When in hex mode, only strings in hex format are allowed to be input, which can refer to the open API. - fPort: refers to the
fPortfield in LoRaWAN packets. - Repeat: the tool allows setting a loop interval for loop issuance testing.
Download the PDF Manual
AdoModel LoRaWAN NS Platform User Guide · 29 pages
Download PDF